Dhass Senior Software Engineer A backend developer who loves to design awesome things. Working for Algorithmia in Seattle

Virtual environments for Python, Ruby and Java

I work with multiple languages and code mostly in Python, Ruby, Java or scala. When working on a project, I would like to isolate the dependencies within the project and not to mess up with the system libraries. I will go through three virtual environments in this post which can be handy while working on a project and gives the flexibility to switch between different versions of the language.

virtualenv - for Python
virtualenv is a tool to create isolated Python environments.

# installing virtualenv
$ [sudo] pip install virtualenv

# initializing virtualenv
$ virtualenv venv # here venv is the folder name and this command creates venv folder

# activating virtualenv
$ source venv/bin/activate

#install dependencies within the folder
$ pip install requests # this will install request lib inside venv folder and you can import requests and run python code within (venv) context.

#deactivate current virtualenv context
$ (venv) deactivate

# creating virtualenv for a particular python version
$ virtualenv --python=/usr/bin/python2.6 venv

rbenv - for Ruby
rbenv is a tool for simple ruby version management. Installation details can be found here

Gist of all commands:

$ brew install rbenv # Installation for mac
$ rbenv init    # initialize rbenv
$ rbenv install -l  # list all available versions:
$ rbenv install 2.0.0-p247 # install a Ruby version
$ rbenv local 1.9.3-p327 # sets the local ruby version
$ rbenv local -unset #unset the local version
$ rbenv global 1.9.3-p327 # set the global system version of ruby
$ rbenv versions #list all ruby versions known to rbenv
$ rbenv shell 1.9.3 # set shell specific ruby.

jEnv - for Java
jEnv is a command line tool to manage java environment.

Commands:

$ brew cask install java #this will install java10
To install java 8, you can use the below commands
$ brew tap caskroom/versions
$ brew cask install java8

$ brew install jenv #install jenv in mac OS
$ jenv add /System/Library/Java/JavaVirtualMachines/1.6.0.jdk/Contents/Home 
$ jenv add /Library/Java/JavaVirtualMachines/jdk17011.jdk/Contents/Home

You can check the folder /System/Library/Java/JavaVirtualMachines/ for the available versions to add to jenv

$ jenv versions #shows all the jenv added versions
$ jenv global oracle64-1.6.0.39 # Configure global version
$ jenv local oracle64-1.6.0.39 # Configure local version (per directory)
$ jenv shell oracle64-1.6.0.39 # Configure shell instance version

Hope the above virtual environments are useful while setting up your projects.
Show top 10 stat in 24 hrs - using Redis

Redis is an open source, in-memory data structure store, used as a database, cache and message broker. It supports data structures such as strings, hashes, lists, sets, sorted sets with range queries, bitmaps, hyperloglogs and geospatial indexes with radius queries.

Let’s take an use case where we would need to get the top 10 stat every hour/24 hrs. Here the stat could be the top accessed attribute in the site like most searched phone number in whitepages.

Redis is super fast and has a rich set of data structures with functionalities. Here we can use the sorted set to build the heap. More documentation can be found in Redis SortedSet. For the example, We could bucketize the phone numbers and their access count per hour. So we can keep creating new buckets every hour and use that as a sliding window of top n stat for the last 24 or 48 hrs.

Design:
We have split the design into two components. First one will the write API which will record the stat. Second will the API which is responsible to read the top 10 stat from redis and return it. Lets see the write, read components in detail below.

Write:
This would involve adding the stat and increment the access count in the current hour bucket(key : cur_date_hour). Here we also set the expiry for the sorted set to the required time so redis handles the deletion of this key and we don’t need to worry about the clean up.

ZADD 20180708_20 1 "XXX-XXX-XXXX" INCR EX 179200

Here I am setting the expiry time as 50 hrs. These sortedset will be expired after 50 hrs after the last write. Incrementing the count of an element can also be done using ZINCRBY but it does not have the expiry option. In that case we need to call EXPIRE for the key in a separate call which adds extra latency.

Read:
For reading the top 10 stat for the last 24 hrs, we combine the sorted set bucket starting from last hour to 24 hrs back. This can be achieved by using ZUNIONSTORE. So the sequence of steps hee would be to query for the key top_cur_date_hr and if the key exists, we can do ZRANGE top_cur_date_cur_hr -10 -1. This will give the top 10 stat in the sortedset. Here, -1 is the highest score and -10 is the 10th highest score. Some optimizations that can be done here are before calling ZUNIONSTORE we can remove the elements from the buckets that is not needed. If we are interested only in top 10 stat, then we can remove any stat whose rank (from bottom) greater than 240 as that will not make it to the top 10. Also note, by default the rank in redis based on lowest score first. We can call ZREMRANGEBYRANK myzset 0 -241 to remove any stat which does not fall in top 120 scores.

Below are the steps before fetching the top 10 for the last 24 hrs.

ZRANGE top_20180708_20 -10 -1

If the above returns value, we return the top 10 stat. But if err no such key is returned which will happen when the new hour rolls, then we do the following We get the cardinality of the set for the previous hour - Complexity O(1) - constant time

ZCARD 20180708_19

If the cardinality is greater than 240, then we remove the elements that are not needed. Complexity here is O(log(N)+M) with N being the number of elements in the sorted set and M the number of elements removed by the operation.

ZREMRANGEBYRANK 20180708_19 0 -241

Then we union the last 24 hrs sortedsets using ZUNIONSTORE. Complexity: O(N)+O(M log(M)) with N being the sum of the sizes of the input sorted sets, and M being the number of elements in the resulting sorted set.

ZUNIONSTORE top_20180708_20 24 20180708_19 20180708_18 .. 20180707_20

The performance of the ZUNIONSTORE depends on the size of the sorted sets that are used to combine. For the last 24 hrs, the final size of the sorted set will be 5760 if all the elements in those sets are distinct. ZUNIONSTORE will just sum the counts when aggregating by default. Other aggregations can also be used while combining the sortedsets.

To further optimize, we can delete the elements which are not in top 10

ZREMRANGEBYRANK 20180708_19 0 -11

We also need to set the EXPIRE for the top_20180708_20 bucket.

For fetching the top 10 stat for the hour, we just call below.

ZRANGE top_20180708_20 -10 -1

I have discussed a way to build a heap in redis and use that to get top 10 attribute based on a statistics . Some of the things considered in this blog are keeping the entire design to one system which is redis here. This could be altered to use a job which runs every hour to do the compaction of the sorted sets. Above design should return results in the order of ms (just the first call in a hour could take a couple of ms but the subsequent calls would be constant time). Another assumption, we have made is, that there will always be a write to redis every hour. If that is not the case, then we might need to go back further while removing the elements which does not fall in top 240. This system can be extended for different use cases and different time limits.

SQLite - in-memory cache

SQLite is a self-contained, high-reliability, embedded, full-featured, public-domain, SQL database engine. It is super easy to install and use it in the code. Here I am going to cover how to use SQLite as an in-memory cache. Often times, we might have some metadata like zipcodes/citycodes mapping which are couple MBs in size. It might be an overkill to create a database and maintain them separately if they are not going to change. For those kind of scenarios my goto solution is SQLite which can be used to easily load CSV files as tables. It is super fast to access those data since they are in memory. If you are using docker, then you don’t even need to worry about cleaning/recreating DB files used by SQLite.

Below are some generic methods I would like to go through.

  1. Creating table from CSV
  2. Get values for a column, filter value.
import gzip
import os
import csv
import re
import sqlite3
from sqlite3 import Error

# allows you to access columns using names 
# whereas a plain tuple would make you use numbered indices
def dict_factory(cursor, row):
    d = {}
    for idx, col in enumerate(cursor.description):
        d[col[0]] = row[idx]
    return d

db_file = 'database.db'

def create_connection(db_file):
    try:
        conn = sqlite3.connect(db_file)
        conn.row_factory = dict_factory
        conn.text_factory = str  # allows utf-8 data to be stored
        return conn
    except Error as e:
        log.logger.error('Error creating sqlite3 connection %s' % e)
        raise e


# create table from csv
def load_csv_to_sql_db():
    conn = create_connection(db_file)
    c = conn.cursor()
    path = CSV_FILE_PATH
    with gzip.open(path, 'rb') as f:
            reader = csv.reader(f)
            # tablename will be the filename here
            tablename = os.path.basename(f.name).split('.')[0]
            header = True

            for row in reader:
                if header:
                    header = False
                    sql = "DROP TABLE IF EXISTS %s" % tablename
                    c.execute(sql)
                    sql = "CREATE TABLE %s (%s)" % (
                        tablename, ", ".join(
                            ["%s text" % re.sub('\W+', '', # filter out any non alphanumeric characters
                             column) for column in row])) 
                    c.execute(sql)
                    log.logger.info('Data table %s created' % tablename)
                    index_cols = (col1, col2) #columns that needs index
                    for column in row:
                        if column.lower() in index_cols:
                            index = "%s__%s" % (tablename, column)
                            sql = "CREATE INDEX %s on %s (%s)" % (
                                index, tablename, column)
                            c.execute(sql)
                        insertsql = "INSERT INTO %s VALUES (%s)" % (
                            tablename, ", ".join(["?" for column in row]))
                    rowlen = len(row)
                else:
                    if len(row) == rowlen:
                        c.execute(insertsql, row)

            conn.commit()
    conn.close()

# read a column and filter out based on value passed
def get_value(table_name, col_name, filter_val):
    conn = create_connection(db_file)
    try:
        cur = conn.cursor()
        cur.execute("SELECT * FROM %s"
                    " WHERE %s=?" % (table_name, col_name), (filter_val,))
        row = cur.fetchone() #fetching single row
        return row or {}
    except Exception as e:
        log.logger.error('Error while fetching %s'
                         ' from table : %s and value : %s' % (
                             col_name, table_name, filter_val))
    conn.close()

Now we have a loaded the data from the CSV into sqlite table and use the interface get_value to access the required columns. We call the ‘load_csv_to_sql_db’ method in before_first_request in flask which is where we load all our inmemory cache values. sqlite3 is also a great command line database for data analysis. I use it all the time to load CSVs and to understand the data. You can find more detail here Command Line Shell For SQLite. The above methods can optimized to your requirement to fetch multiple values, reusing the connection objects, etc. I have just showcased a pattern to use SQLite as an in-memory cache.

Design reviews - good engineering practice

Design reviews are a nice process to get feedback from other engineers in the company when designing a new system/feature. It is a learning opportunity for the designer and a good collaboration method to design better systems using the expertise of senior folks in the company. I would like to explain the process we follow at WP when developing a new feature or system. These are three components to the design review.

  1. Writing a design document.
  2. Sharing the document and receiving feedback.
  3. Schedule a meeting and go over the design for any flaws/improvements.

Writing design document: The engineer who is writing the document should be thoughtful about explaining the product specification and full feature design details so that other engineers who may not be aware of the complete system would still be able to get a full picture and be able to provide feedback on the design.

Below are some basic components that has to be covered in the document.

  • Product specification
  • High level design
  • Alternate designs/considerations
  • Assumptions
  • Cost of resources.
  • Operations - monitoring/logging/deployment.
  • Testing
  • Milestones/estimates.

Design document is a good way to document the feature/system at a high level which can used by other engineers to understand to implement/extend the system.

Sharing and receiving feedback: Once the design document is prepared, it is shared to a larger audience who can then comment on various sections of the document. This might help in redesigning/improve the system over the course of review. Engineer who is designing the system should be open to suggestions which will help in improving the system and use the feedback as a good learning opportunity and knowledge sharing.

Schedule a meeting: The meeting has to be scheduled with the smaller group who have suggestions/comments on the design. PMs are also involved in these meeting to give an overview of the business requirement of the feature and help in trade-offs while considering business decisions in system design. The expectation is that whoever is attending the meeting should have gone through the document and have some suggestion. Unresolved comments are discussed and resolved based on healthy discussions. Once all the meeting members agrees on the design, the document is frozen and the development starts.

Responsibilities
Designers:

Engineer who is writing the design document should give complete context of the designed system so that reviewers can understand the system well. He/She should use this as a learning opportunity to improve their design skills and use senior engineers knowledge to improve the system designed.

Reviewers:

They should be mindful of the changes they are suggesting with the intention of developing well engineered systems and also considering the time of the designer and business implications. Important thing here is to keep the ego aside when discussing system design with other peers. As most of the time, system design considerations are subjective and are respective to systems used vs cost vs development time vs performance, etc, etc.

For more details to consider while designing systems, I would recommend reading AWS well-architected framework . This is just an overview of the design review process. This can be changed based on the requirement of the company and engineers available time.

A good read on writing a good design document can be found here

JSONB - NoSQL in postgres

We use postgres and different types of NoSQL systems in our production systems. There is always a question whether to go with either adding those values to the RDBMS, postgres in our case or simply go with NoSQL. NoSQL gives you the flexibility to not normalize the data and going schemaless. But there is a caveat when two different systems are used for persisting values. You need to take care of ACID in your application code. It will get harder as table gets complex.

Some examples of schemaless data you might want to store could be normalized address(address_line_1,address_line_2, city, state, zip code). If you don’t get all the address values and it is simpler to store address object as a column. Other examples are storing receipts, reports from other external APIs which can be persisted before processing, adding metadata/properties to an attribute.

So a better solution would be store these schemaless values as a column with other attributes in your table .That will save a lot of headache querying two different systems. Postgres has JSON support for a while but Postgres 9.4 added indexing which is the most important feature when it comes to performance in DB. JSONB will be ideal when you don’t need extensive querying on the data stored inside it. Summarizing the pros and cons below.

Pros:

  • Easier to store all the values in one system, database takes care of ACID property.
  • Allows indexing - GIN (Generalized Inverted Index) index, making it faster to access.
  • Ideal for schemaless where normalizing the data attributes would be overengineering.

Cons:

  • JSONB is stored as strings so will take up more space in the table. It will be a concern when your DBA has to handle 100s of GBs of data when doing backup/migration.
  • Postgres does not store metadata values about NULL values, counts and distinct. So query related to that might be slower.

You can also use jsonb_pretty to pretty print the JSON data

-- pretty print JSONB
SELECT jsonb_pretty(json_data) FROM table;

We have been storing values as JSONB in our production and has saved a lot of development time and keeps the application code simple.

References:
www.postgresql.org/docs/9.4/static/datatype-json.html
blog.codeship.com/unleash-the-power-of-storing-json-in-postgres/
www.sarahmei.com/blog/2013/11/11/why-you-should-never-use-mongodb/
heapanalytics.com/blog/engineering/when-to-avoid-jsonb-in-a-postgresql-schema

My TODO list and daily schedule hack

Recently, I have been trying to optimize the way I spent my day and keep track of my daily schedule. I have experimented with different techniques like just writing a set of TODOs as soon I start my day in a text editor. Then I try to mark them as done once the task is completed. It worked for me most of the days but there are days when I just feel like I am exhausted doing a lot of work. But at the end of the day I would mostly have spent my time in meetings or got stuck at a particular task. There will also be days I would be overwhelmed by the number of tasks and start to procrastinate. This would mostly happen on weekends.

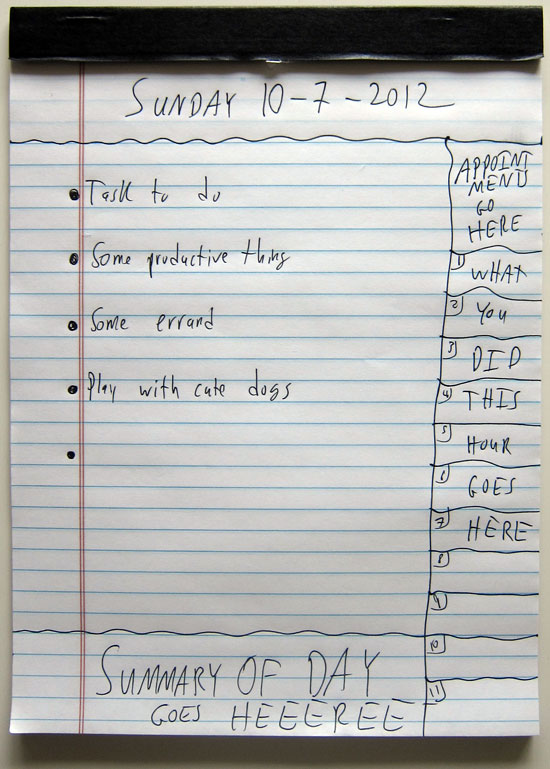
Some days ago, I tweaked the technique mentioned in the nevblog blog and found myself being on track everyday. Below is the sample TODO list

TODO-list-sample

I update the schedule column every hour about what I did that hour. So far this hack with paper and pen has worked for me the best. It is just keeping a TODO list in a scratchpad with hourly schedule on the right side of the sheet. It clearly shows how much progress I am making at a particular point of time in a day. Additional to the TODO list and the schedule, I write a summary of the day at the bottom. It just gives so much clarity on what I was doing all day and how I can improve on. If you are looking for a TODO list hack give it a try.

First post

This is my first post - so hello to all and am very excited to write a lot of my thoughts here. Stay tuned.

Let me try a code snippet!

def hello(name)
  print "Hi, %s" % name
end
hello('Tom')
#=> prints 'Hi, Tom' to STDOUT.